Hey yall! I wanted to write to a quick blog post before I head to bed. Sometimes yes, I do feel like writing spontaneously and tonight’s that night. So at 10:21 I want to give you 4 easy steps on how you can improve your nails! That’s right! Some free advice for ya!
Because let’s face it, shaping nails is very hard and it doesn’t come to everyone the same. We all learn differently right? Right! So here’s some guidance for you. And I know a lot of people can be visual learners so I made a picture and marked it to help ya even more. This is truly for everyone!
Now, this can be applied to multiple shapes of nails not just almond nails like shown. So whether you are doing stiletto, round, coffin, square, or even lipstick. This all applies the same.
So are you ready for your steps? Let’s begin!
Step 1
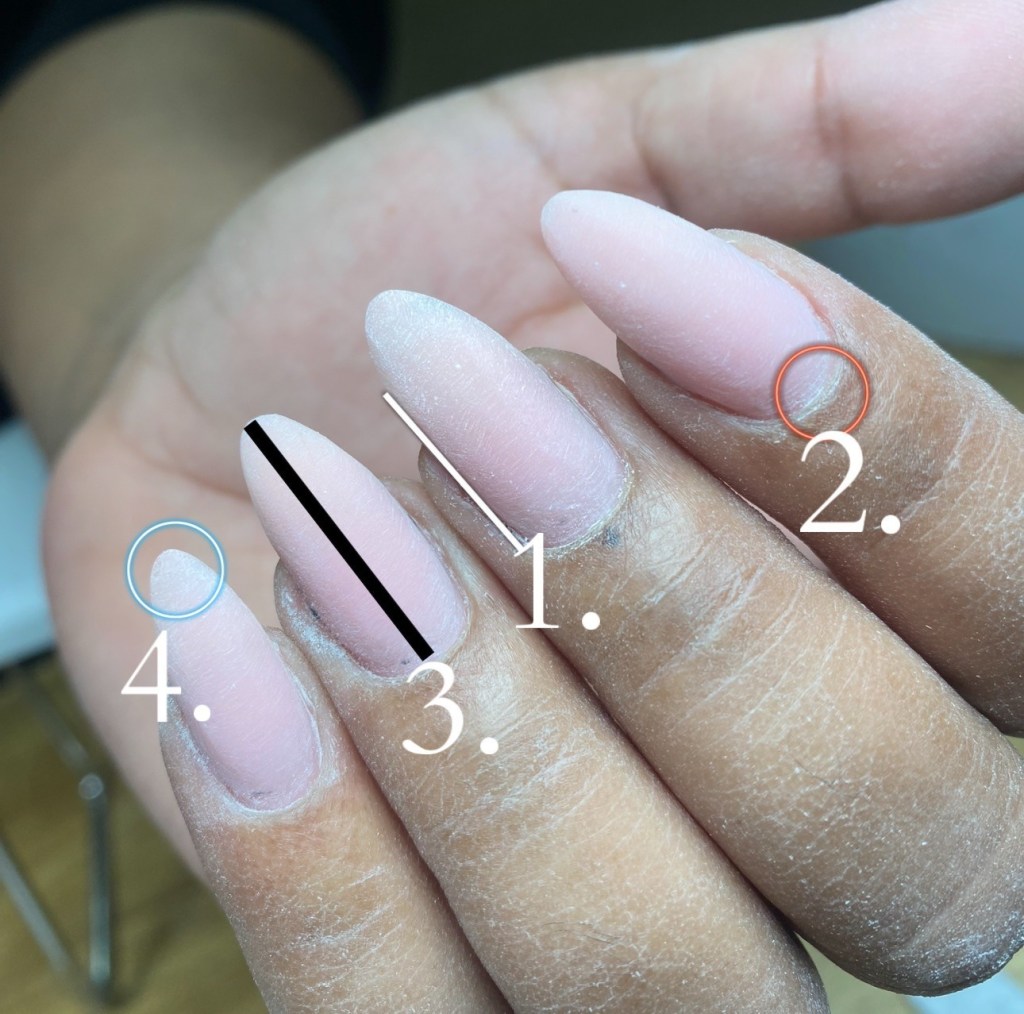
Nails don’t extend over into skin area. They stay straight and don’t flare from growth channel. Nails are meant to stay within the parameters of a natural nail. Unless you’re going for a different look on purpose then that’s ok too. But, when filing the sides of the nail make sure the edges stay away from the skin and don’t flare out. Also, make sure one side is as identical to the other. This can give the appearance of bulkiness or unevenness.
Step 2
Nails are flush to nail plate area around nail fold. This is very important as you don’t want product to flood the cuticle area. This can cause lifting. Also, nail products are made for the nail! Not the skin. So keep it nice and clean. A good rule of thumb is to leave a small line between product and cuticle area. You can also push the skin back with a cuticle pusher right before application and use a liner brush to fill in the area. And when the skin relaxes it will look flush. That’s a pro tip right there.
Step 3
All 4 nails are the same length. And should be straight in line to finger. Does not veer left or right. I know this sounds very normal but it’s actually hard. We typically file nails one by one. And to get them to be perfectly the same length you have to put one finger next to the other. Or you could measure. But looking down the barrel of the nail, the nail should be perfectly straight and even and not point left or right. Follow the tip of the finger, not the whole finger. As most people actually don’t always have straight fingers. That’s another pro tip. Trust, you learn from experience.
Step 4
The tip of nail is the correct uniform shape across all nails. Ok so this is actually very hard and I’m happy to help. What I do to make sure all tips look the same, is make the first one as perfect as possible or. Of finger 1. And then make all the rest of the nails look like finger 1. If finger 3 ends up looking better because I’ve done two and can see it truly is better. Then finger 1 and 2 need to be like finger 3, and then 4 will follow and look great too. It’s all about symmetry.
So how do you think you’ll do? I think with these steps you’ll train your eye to see things you’ve never seen before. And that will put you on the right track to shaping great nails. And just remember, great shaping takes time. You learn the skills one day, you put them into practice the next. And with consistency and repetition, you’ll be surprised how far you’ve come by the end of the week! Yes just that quick. But it takes practice.
Because you’ve gotta know what you’re looking for, and now that you have a visual on what you ar looking for, you can put it into play and start tackling those clients and earning more as well. Because when you learn something new and become proficient, you become higher quality and can charge more.
So I hope these 4 easy steps on how to improve your nails helps. Until then, I’ll see ya later sweets.
Leave a Reply